网站域名com和cn产品宣传
这次给老铁们带来的是京东手势验证码的识别。
目标网站:https://plogin.m.jd.com/mreg/index
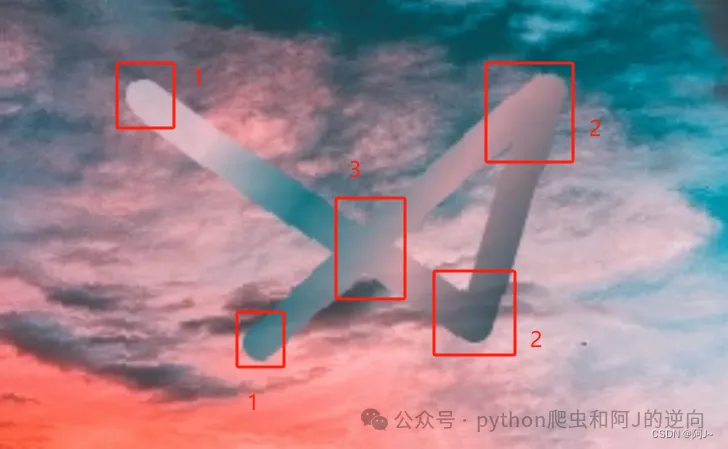
验证码如下图:

当第一眼看到这个验证码的时候,就头大了,这玩意咋识别???
静下心来细想后的一个方案,就是直接用yolo的目标检测去硬刚,方案如下:
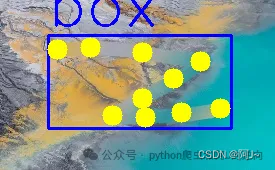
根据曲线的特征,提取较特殊的
- 起末点(1)
- 转折点(2)
- 相较点(3)
进行打标提取几个点的位置,然后根据曲线斜率和长度的关系进行连接,得到曲线的轨迹,但是这种我感觉成功率可能不会很高,就没有试了,不过肯定也是可行的,感兴趣的可以自行尝试哈。
于是我便寻找下一种方案,辗转反侧,夜不能寐,终于看到一篇文章介绍了
yolo8-pose姿态检测模型
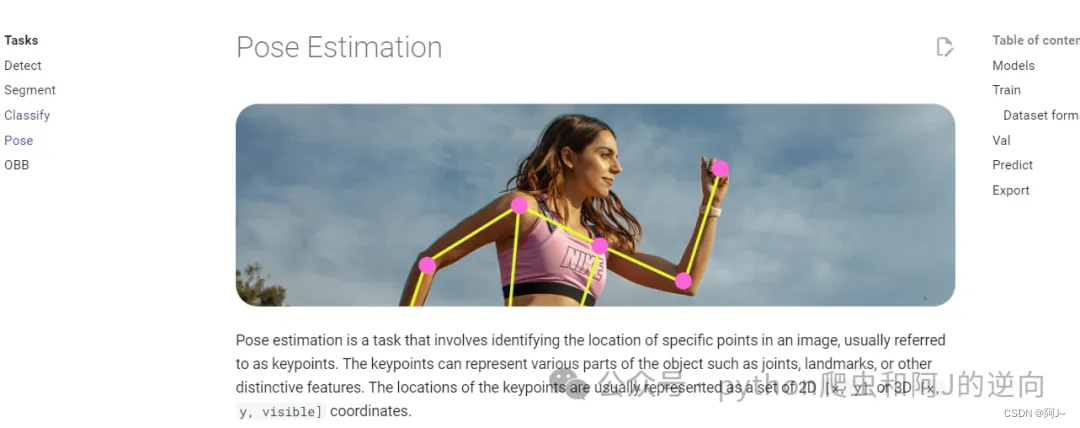
可以通过目标图关键点实现骨架连接,那么同理我们的手势曲线,也可利用关键点检测实现轨迹连接。
话不多说直接开干
yolo8仓库地址:https://github.com/ultralytics/ultralytics
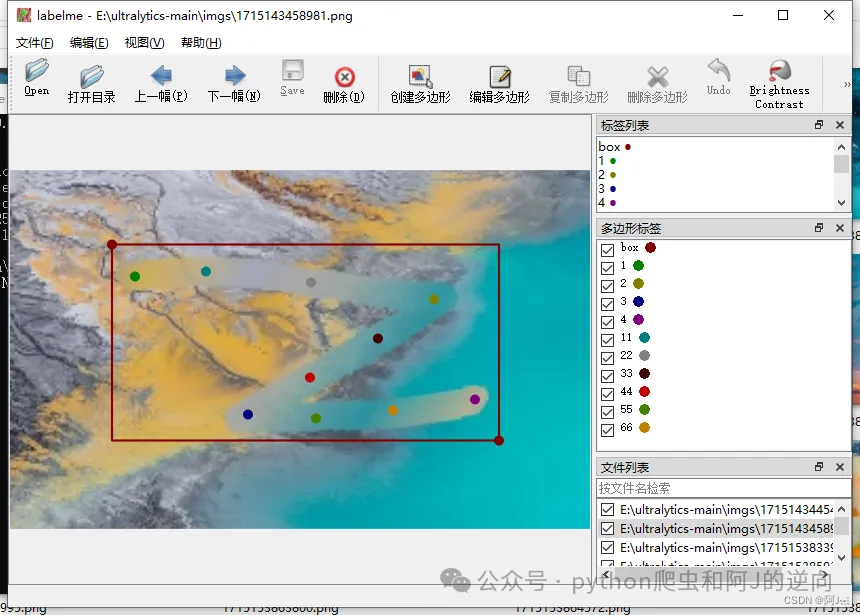
然后下载labelme标注软件,图片可存放在ultralytics目录下新建的imgs文件夹。
yolo8-pose 需要进行目标框选和关键点匹配,进行如下形式的标注,
这里一开始的关键点我只用了4个,训练出来的效果极差,后面加到了10个相对好很多。
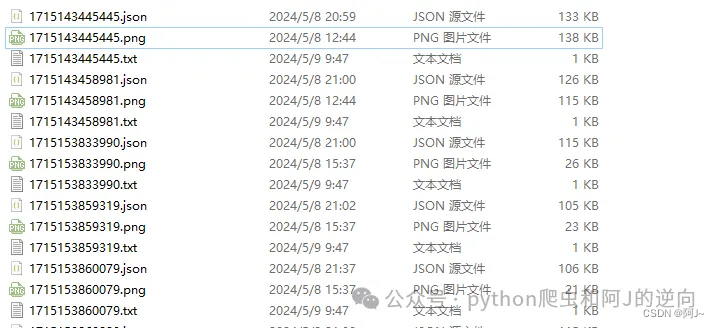
打标完成后会生成json文件,我们要转换成yolo可以识别txt文件
这里需要注意这些参数
- class_list 是你框选的名称
- keypoint_list 是关键点名称,要按顺序来,不然连接的时候会乱
- img_list = glob.glob(“imgs/*.png”) 图片加载路径
# -*-coding:utf-8 -*-"""
# File       : labelme_to_yolo.py
# Time       : 2024/5/8 16:40
# Author     : 阿J
# version    : 2024
# Description:
"""
# 将labelme标注的json文件转为yolo格式
import cv2
import glob
import json
import tqdm# 物体类别class_list = ["box"]
# 关键点的顺序
keypoint_list = ["1",'11','22', "2",'33','44', "3",'55','66', "4"]def json_to_yolo(img_data, json_data):h, w = img_data.shape[:2]# 步骤:# 1. 找出所有的矩形,记录下矩形的坐标,以及对应group_id# 2. 遍历所有的head和tail,记下点的坐标,以及对应group_id,加入到对应的矩形中# 3. 转为yolo格式rectangles = {}# 遍历初始化for shape in json_data["shapes"]:label = shape["label"]  # pen, head, tailgroup_id = shape["group_id"]  # 0, 1, 2, ...points = shape["points"]  # x,y coordinatesshape_type = shape["shape_type"]# 只处理矩形,读矩形if shape_type == "rectangle":if group_id not in rectangles:rectangles[group_id] = {"label": label,"rect": points[0] + points[1],  # Rectangle [x1, y1, x2, y2]"keypoints_list": []}# 遍历更新,将点加入对应group_id的矩形中,读关键点,根据group_id匹配for keypoint in keypoint_list:for shape in json_data["shapes"]:label = shape["label"]group_id = shape["group_id"]points = shape["points"]# 如果匹配到了对应的keypointif label == keypoint:rectangles[group_id]["keypoints_list"].append(points[0])# else:#   rectangles[group_id]["keypoints_list"].append([0,0])# 转为yolo格式yolo_list = []for id, rectangle in rectangles.items():result_list = []if rectangle['label'] not in class_list:continuelabel_id = class_list.index(rectangle["label"])# x1,y1,x2,y2x1, y1, x2, y2 = rectangle["rect"]# center_x, center_y, width, heightcenter_x = (x1 + x2) / 2center_y = (y1 + y2) / 2width = abs(x1 - x2)height = abs(y1 - y2)# normalizecenter_x /= wcenter_y /= hwidth /= wheight /= h# 保留6位小数center_x = round(center_x, 6)center_y = round(center_y, 6)width = round(width, 6)height = round(height, 6)# 添加 label_id, center_x, center_y, width, heightresult_list = [label_id, center_x, center_y, width, height]# 添加 p1_x, p1_y, p1_v, p2_x, p2_y, p2_vfor point in rectangle["keypoints_list"]:x, y = pointx, y = int(x), int(y)x /= wy /= h# 保留2位小数x = round(x, 2)y = round(y, 2)result_list.extend([x, y, 2])# if len(rectangle["keypoints_list"]) == 4:#     result_list.extend([0, 0, 0])#     result_list.extend([0, 0, 0])#     result_list.extend([0, 0, 0])#     result_list.extend([0, 0, 0])#     result_list.extend([0, 0, 0])## if len(rectangle["keypoints_list"]) == 2:#     result_list.extend([0, 0, 0])#     result_list.extend([0, 0, 0])#     result_list.extend([0, 0, 0])#     result_list.extend([0, 0, 0])#     result_list.extend([0, 0, 0])#     result_list.extend([0, 0, 0])#     result_list.extend([0, 0, 0])yolo_list.append(result_list)return yolo_listimport os
print(os.getcwd())
# 获取所有的图片
img_list = glob.glob("imgs/*.png")
for img_path in tqdm.tqdm(img_list):img = cv2.imread(img_path)print(img_path)json_file = img_path.replace('png', 'json')with open(json_file) as json_file:json_data = json.load(json_file)yolo_list = json_to_yolo(img, json_data)yolo_txt_path = img_path.replace('png', 'txt')with open(yolo_txt_path, "w") as f:for yolo in yolo_list:for i in range(len(yolo)):if i == 0:f.write(str(yolo[i]))else:f.write(" " + str(yolo[i]))f.write("\n")
执行上面的代码后就会生成txt文件
然后我们在ultralytics目录下的ultralytics/data新建images、labels文件夹,目录格式如下,然后对imges图片和labels标签(txt)进行分类即可
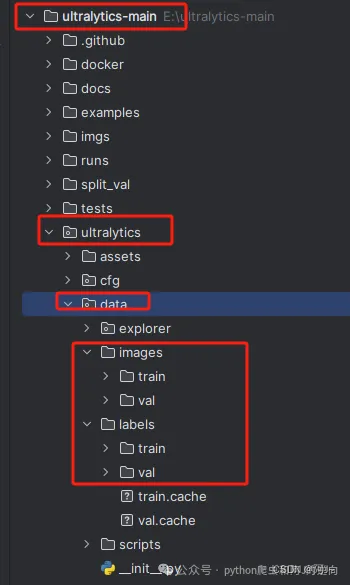
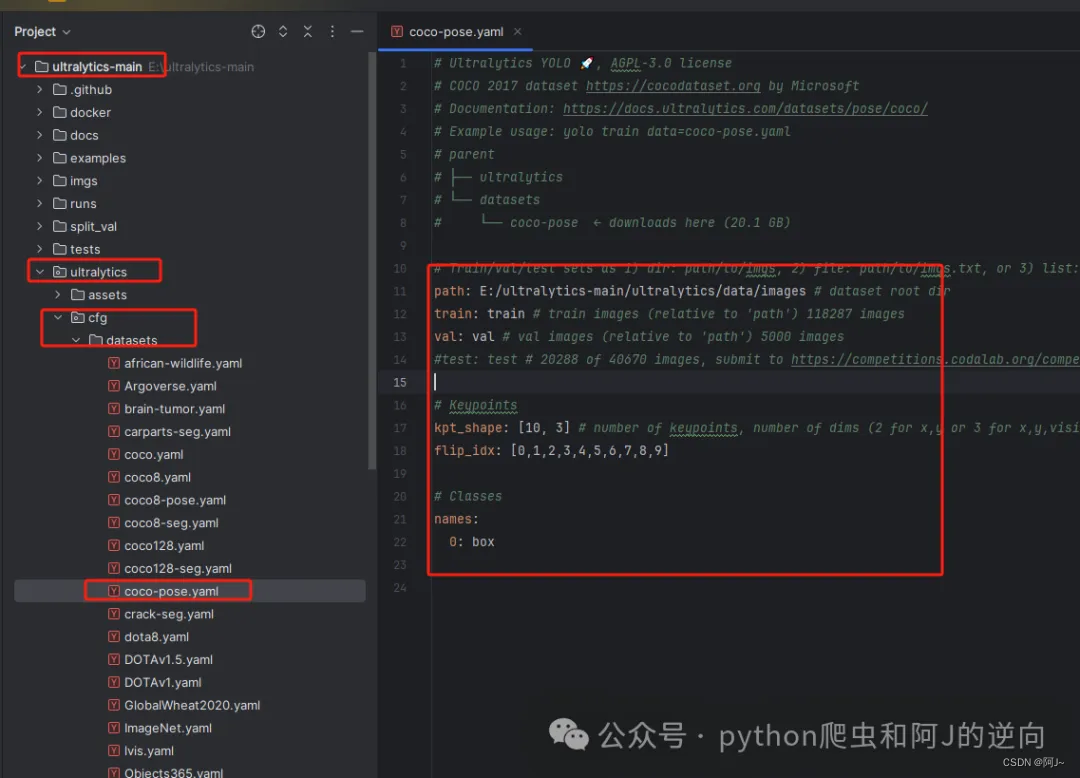
接着是修改yaml文件,如下图所示
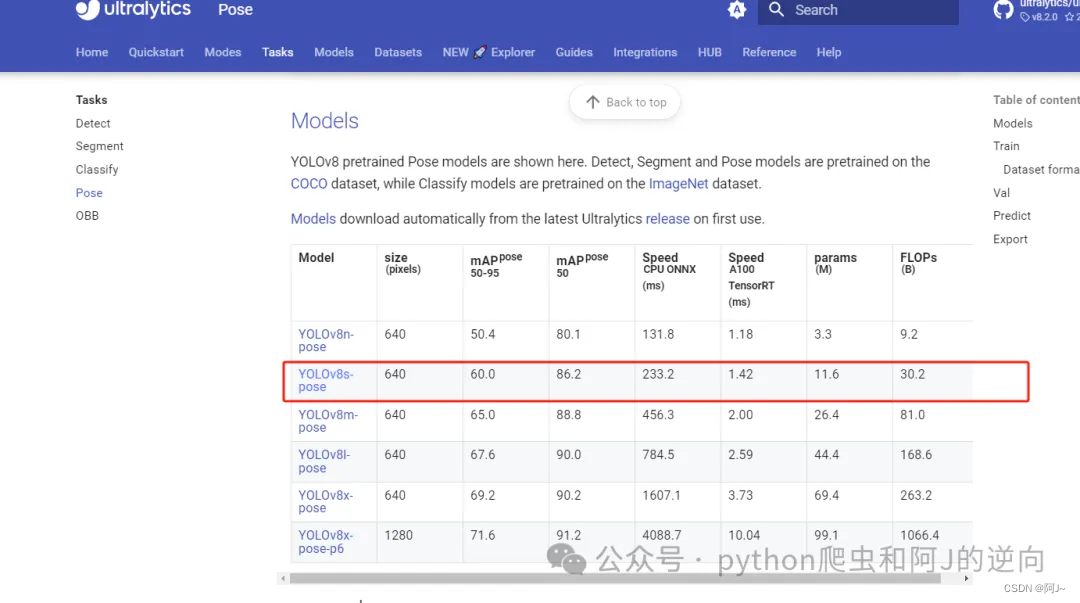
当然还需要下载预训练模型yolov8s-pose.pt,在官网的这个位置
最后新建一个my_train.py文件,对应填入yaml、model的路径即可开始训练
# -*-coding:utf-8 -*-"""
# File       : my_train.py
# Time       : 2024/5/8 16:55
# Author     : 阿J
# version    : 2024
# Description:
"""
#训练代码
from ultralytics import YOLO# Load a model
model = YOLO(r'E:\ultralytics-main\ultralytics\weight\yolov8s-pose.pt')# Train the model
results = model.train(data=r'E:\ultralytics-main\ultralytics\cfg\datasets\coco-pose.yaml', epochs=300, imgsz=320)# # 验证代码
# from ultralytics import YOLO
#
# # Load a model
# model = YOLO(r'E:\ultralytics-main\runs\pose\train4\weights\last.pt')
#
# # Val the model
# results = model.val(data=r'E:\ultralytics-main\ultralytics\cfg\datasets\coco-pose.yaml',imgsz=320,batch=6,workers=8)
左边是目标检测,右边是关键点检测(map50会慢慢上去)
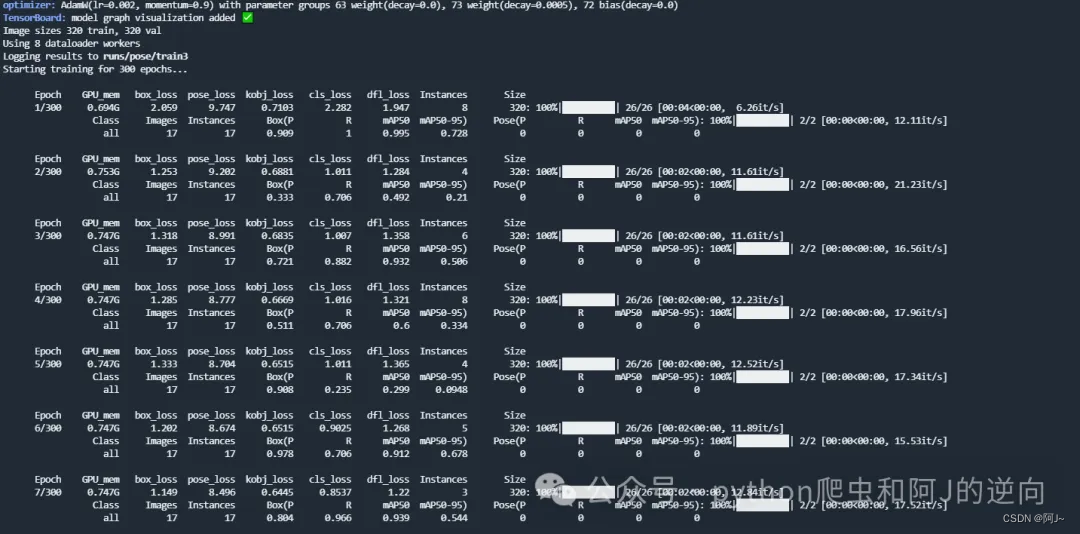
训练好后,可以用上面的的验证代码进行验证一下,模型路径在runs\pose\train
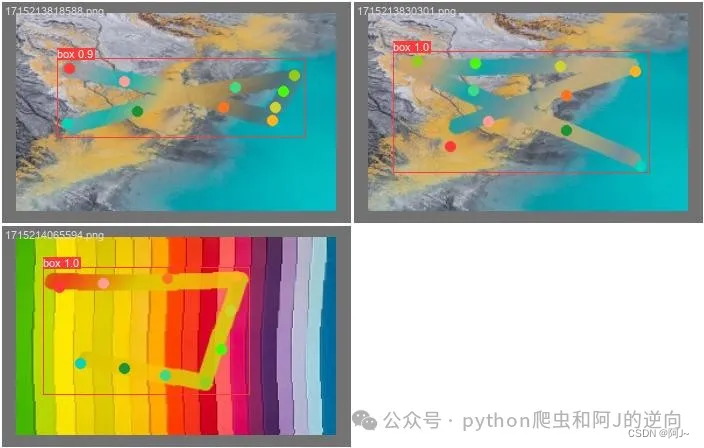
打标图片
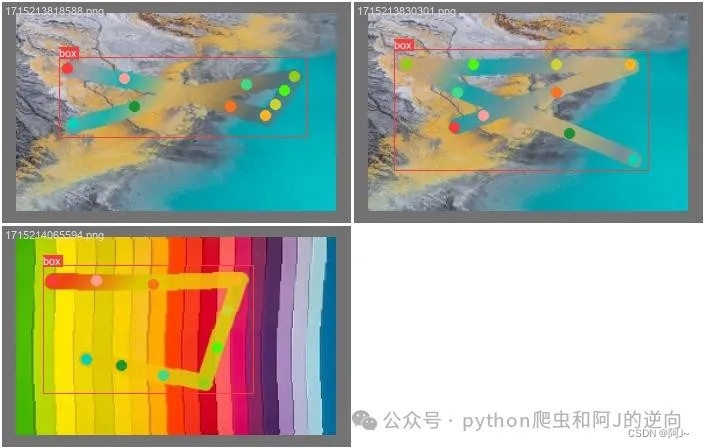
验证图片
也可用以下代码进行推理
# -*-coding:utf-8 -*-"""
# File : 推理.py
# Time : 2024/5/8 17:59
# Author : 阿J
# version : 2024
# Description:
"""
import io# 测试图片
from ultralytics import YOLO
import cv2
import numpy as np
import time# 读取命令行参数
# weight_path = r'E:\ultralytics-main\runs\pose\train4\weights\last.pt'
weight_path = 'best.pt'
# media_path = "img/1715153883102.png"
# media_path = "xxx.png"
media_path = "img.png"time1 = time.time()
# 加载模型
model = YOLO(weight_path)
print("模型加载时间:", time.time() - time1)
# 获取类别
objs_labels = model.names # get class labels
# print(objs_labels)# 类别的颜色
class_color = [(255, 0, 0), (0, 255, 0), (0, 0, 255), (255, 255, 0),(255, 0, 0), (0, 255, 0), (0, 0, 255), (255, 255, 0),(255, 0, 0), (0, 255, 0)]
# 关键点的顺序
class_list = ["box"]# 关键点的颜色
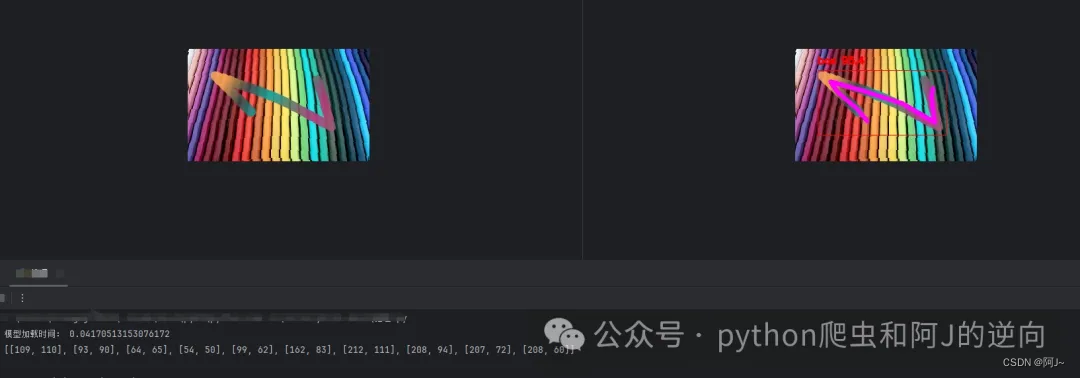
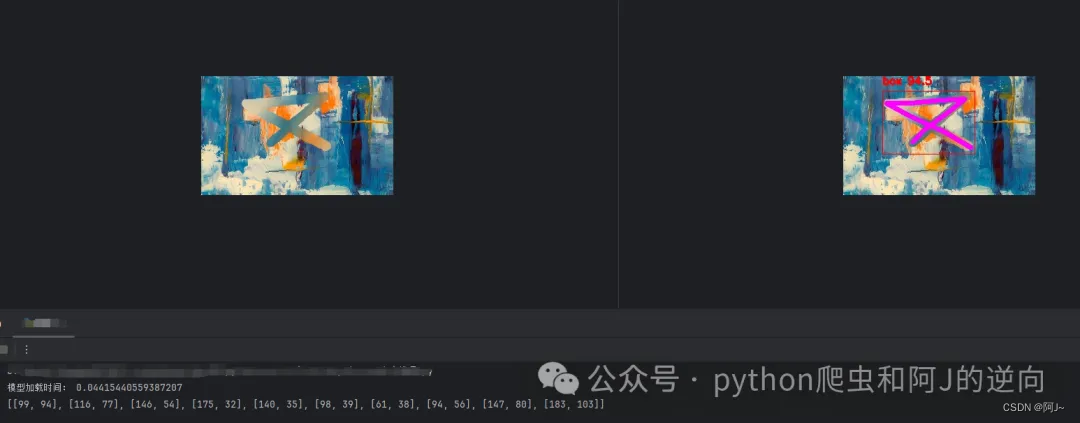
keypoint_color = [(255, 0, 0), (0, 255, 0),(255, 0, 0), (0, 255, 0),(255, 0, 0), (0, 255, 0),(255, 0, 0), (0, 255, 0),(255, 0, 0), (0, 255, 0)]def cv2_imread_buffer(buffer):# 假设buffer是一个字节流对象buffer = io.BytesIO(buffer)# 将buffer转换为numpy数组arr = np.frombuffer(buffer.getvalue(), np.uint8)# 使用cv2.imdecode函数将numpy数组解码为图像img = cv2.imdecode(arr, cv2.IMREAD_COLOR)return imgdef pose_ocr(img):# 读取图片if isinstance(img,str):frame = cv2.imread(img)else:frame = cv2_imread_buffer(img)# frame = cv2.resize(frame, (280, 280))# 检测result = list(model(frame, conf=0.5, stream=True))[0] # inference,如果stream=False,返回的是一个列表,如果stream=True,返回的是一个生成器boxes = result.boxes # Boxes object for bbox outputsboxes = boxes.cpu().numpy() # convert to numpy array# 遍历每个框for box in boxes.data:l, t, r, b = box[:4].astype(np.int32) # left, top, right, bottomconf, id = box[4:] # confidence, classid = int(id)# 绘制框cv2.rectangle(frame, (l, t), (r, b), (0, 0, 255), 1)# 绘制类别+置信度(格式:98.1%)cv2.putText(frame, f"{objs_labels[id]} {conf * 100:.1f}", (l, t - 10), cv2.FONT_HERSHEY_SIMPLEX, 0.5,(0, 0, 255), 2)# 遍历keypointskeypoints = result.keypoints # Keypoints object for pose outputskeypoints = keypoints.cpu().numpy() # convert to numpy arraypose_point = []# draw keypoints, set first keypoint is red, second is bluefor keypoint in keypoints.data:pose_point = [[round(x),round(y)] for x,y,c in keypoint]for i in range(len(keypoint)):x, y ,_ = keypoint[i]x, y = int(x), int(y)cv2.circle(frame, (x, y), 3, (0, 255, 0), -1)#cv2.putText(frame, f"{keypoint_list[i]}", (x, y - 10), cv2.FONT_HERSHEY_SIMPLEX, 1, keypoint_color[i], 2)if len(keypoint) >= 2:# draw arrow line from tail to half between head and tailx0, y0 ,_= keypoint[0]x1, y1 ,_= keypoint[1]x2, y2 ,_= keypoint[2]x3, y3 ,_= keypoint[3]x4, y4 ,_= keypoint[4]x5, y5 ,_= keypoint[5]x6, y6 ,_= keypoint[6]x7, y7 ,_= keypoint[7]x8, y8 ,_= keypoint[8]x9, y9 ,_= keypoint[9]cv2.line(frame, (int(x0), int(y0)), (int(x1), int(y1)), (255, 0, 255), 5)cv2.line(frame, (int(x1), int(y1)), (int(x2), int(y2)), (255, 0, 255), 5)cv2.line(frame, (int(x2), int(y2)), (int(x3), int(y3)), (255, 0, 255), 5)cv2.line(frame, (int(x3), int(y3)), (int(x4), int(y4)), (255, 0, 255), 5)cv2.line(frame, (int(x4), int(y4)), (int(x5), int(y5)), (255, 0, 255), 5)cv2.line(frame, (int(x5), int(y5)), (int(x6), int(y6)), (255, 0, 255), 5)cv2.line(frame, (int(x6), int(y6)), (int(x7), int(y7)), (255, 0, 255), 5)cv2.line(frame, (int(x7), int(y7)), (int(x8), int(y8)), (255, 0, 255), 5)cv2.line(frame, (int(x8), int(y8)), (int(x9), int(y9)), (255, 0, 255), 5)#center_x, center_y = (x1 + x2) / 2, (y1 + y2) / 2# cv2.arrowedLine(frame, (int(x2), int(y2)), (int(center_x), int(center_y)), (255, 0, 255), 4,# line_type=cv2.LINE_AA, tipLength=0.1)# save imagecv2.imwrite("result.jpg", frame)# print("save result.jpg")return pose_pointif __name__ == '__main__':img = './img.png'res = pose_ocr(img)print(res)效果如下,输出的是关键点坐标
后面就是代入到验证码的识别验证接口,具体参数加密这里就不叙述,主要就是调wasm即可。
接下来讲的是如何实现这个曲线的轨迹,众所周知京东的轨迹是一向比较恶心的。
我用的方法是贝塞尔曲线的方式,通过对输入的坐标,实现一个轨迹的拟合效果。
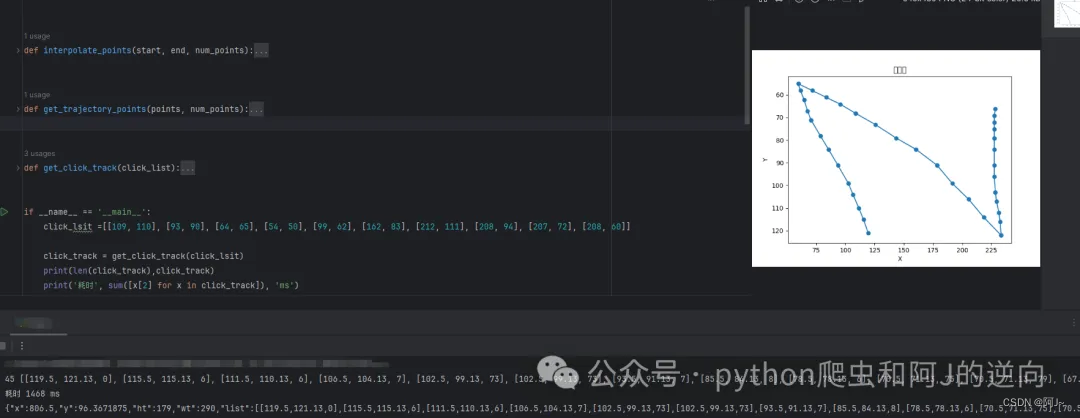
经过一系列的参数调整,终于得到一个成功率相对可以的(60-80%)轨迹生成函数,弄的时候发现在转折点时,停留时间需长一点!
轨迹代码已上传星球,感兴趣的可以加一下哦!vx私聊我有优惠~
同时已建群,在外流浪的老铁私信我进群了(星球付费群),每天都会讨论各种技术问题(ali、tx、dx)等各种热门验证码~
wx:scorpio_a_j