深圳网站制作公司流程谷歌浏览器 安卓下载
在上一篇文章中,我们学习了如何利用人工智能技术(例如开源 AI 向量数据库 Milvus 和 Hugging Face 模型)寻找与自己穿搭风格相似的明星。在这篇文章中,我们将进一步介绍如何通过对上篇文章中的项目代码稍作修改,获得更详细和准确的结果,文末附赠彩蛋。
注:试用此项目应用,需要点击下载并使用 notebook
01.回顾前文
在深入探讨前,先简要回顾一下前一篇教程文章。
导入所需的图像处理库和工具
首先导入所有必要的图像处理库,包括用于特征提取的 torch、transformers 中的 segformer 对象、matplotlib 和 torchvision 中的 Resize、masks_to_boxes和crop 等。
import torch
from torch import nn, tensor
from transformers import AutoFeatureExtractor, SegformerForSemanticSegmentation
import matplotlib.pyplot as plt
from torchvision.transforms import Resize
import torchvision.transforms as T
from torchvision.ops import masks_to_boxes
from torchvision.transforms.functional import crop
预处理明星照片
在导入所有必要的图像处理库和工具后,就可以开始处理图像。以下三个函数 get_segmentation、get_masks 和 crop_images 用于分割并裁剪图片中的时尚单品,以供后续使用。
import torch
def get_segmentation(extractor, model, image):inputs = extractor(images=image, return_tensors="pt")outputs = model(**inputs)logits = outputs.logits.cpu()upsampled_logits = nn.functional.interpolate(logits,size=image.size[::-1],mode="bilinear",align_corners=False,)pred_seg = upsampled_logits.argmax(dim=1)[0]return pred_seg# 返回两个 masks(tensor)列表和 obj_ids(int)
# 来自 Hugging Face 的 mattmdjaga/segformer_b2_clothes 模型
def get_masks(segmentation):obj_ids = torch.unique(segmentation)obj_ids = obj_ids[1:]masks = segmentation == obj_ids[:, None, None]return masks, obj_idsdef crop_images(masks, obj_ids, img):boxes = masks_to_boxes(masks)crop_boxes = []for box in boxes:crop_box = tensor([box[0], box[1], box[2]-box[0], box[3]-box[1]])crop_boxes.append(crop_box)preprocess = T.Compose([T.Resize(size=(256, 256)),T.ToTensor()])cropped_images = {}for i in range(len(crop_boxes)):crop_box = crop_boxes[i]cropped = crop(img, crop_box[1].item(), crop_box[0].item(), crop_box[3].item(), crop_box[2].item())cropped_images[obj_ids[i].item()] = preprocess(cropped)return cropped_images
将图像数据存储到向量数据库中
选择开源向量数据库 Milvus 来存储图像数据。开始前,需要先解压包含照片的 zip 文件,并在 notebook 相同的根目录中创建照片文件夹。完成后,可以运行以下代码来将图像数据存储在 Milvus 中。
import os
image_paths = []
for celeb in os.listdir("./photos"):for image in os.listdir(f"./photos/{celeb}/"):image_paths.append(f"./photos/{celeb}/{image}")from milvus import default_server
from pymilvus import utility, connections
default_server.start()
connections.connect(host="127.0.0.1", port=default_server.listen_port)
DIMENSION = 2048
BATCH_SIZE = 128
COLLECTION_NAME = "fashion"
TOP_K = 3
from pymilvus import FieldSchema, CollectionSchema, Collection, DataTypefields = [FieldSchema(name="id", dtype=DataType.INT64, is_primary=True, auto_id=True),FieldSchema(name='filepath', dtype=DataType.VARCHAR, max_length=200),FieldSchema(name="name", dtype=DataType.VARCHAR, max_length=200),FieldSchema(name="seg_id", dtype=DataType.INT64),FieldSchema(name='embedding', dtype=DataType.FLOAT_VECTOR, dim=DIMENSION)
]schema = CollectionSchema(fields=fields)
collection = Collection(name=COLLECTION_NAME, schema=schema)
index_params = {"index_type": "IVF_FLAT","metric_type": "L2","params": {"nlist": 128},
}
collection.create_index(field_name="embedding", index_params=index_params)
collection.load()
接着,运行以下代码,使用来自 Hugging Face 的 Nvidia ResNet 50 模型生成 embedding 向量。
# 如遇 SSL 证书 URL 错误,请在导入 resnet50 模型前运行此步骤
import ssl
ssl._create_default_https_context = ssl._create_unverified_context
# 并删除最后一层模型输出
embeddings_model = torch.hub.load('NVIDIA/DeepLearningExamples:torchhub', 'nvidia_resnet50', pretrained=True)
embeddings_model = torch.nn.Sequential(*(list(embeddings_model.children())[:-1]))
embeddings_model.eval()
以下函数定义了如何将图像转换为向量并插入到 Milvus 向量数据库中。代码会循环遍历所有图像。(注意:如果需要开启 Milvus 全新特性动态 Schema,需要修改代码。)
def embed_insert(data, collection, model):with torch.no_grad():output = model(torch.stack(data[0])).squeeze()collection.insert([data[1], data[2], data[3], output.tolist()])
from PIL import Image
data_batch = [[], [], [], []]for path in image_paths:image = Image.open(path)path_split = path.split("/")name = " ".join(path_split[2].split("_"))segmentation = get_segmentation(extractor, model, image)masks, ids = get_masks(segmentation)cropped_images = crop_images(masks, ids, image)for key, image in cropped_images.items():data_batch[0].append(image)data_batch[1].append(path)data_batch[2].append(name)data_batch[3].append(key)if len(data_batch[0]) % BATCH_SIZE == 0:embed_insert(data_batch, collection, embeddings_model)data_batch = [[], [], [], []]if len(data_batch[0]) != 0:embed_insert(data_batch, collection, embeddings_model)collection.flush()
查询向量数据库
以下代码演示了如何使用输入图像查询 Milvus 向量数据库,以检索和上传衣服图像最相似的的前三个结果。
def embed_search_images(data, model):with torch.no_grad():output = model(torch.stack(data))if len(output) > 1:return output.squeeze().tolist()else:return torch.flatten(output, start_dim=1).tolist()
# data_batch[0]是 tensor 列表
# data_batch[1]是图像文件的文件路径(字符串)
# data_batch[2]是图像中人物的名称列表(字符串)
# data_batch[3]是分割键值列表(int)
data_batch = [[], [], [], []]search_paths = ["./photos/Taylor_Swift/Taylor_Swift_3.jpg", "./photos/Taylor_Swift/Taylor_Swift_8.jpg"]for path in search_paths:image = Image.open(path)path_split = path.split("/")name = " ".join(path_split[2].split("_"))segmentation = get_segmentation(extractor, model, image)masks, ids = get_masks(segmentation)cropped_images = crop_images(masks, ids, image)for key, image in cropped_images.items():data_batch[0].append(image)data_batch[1].append(path)data_batch[2].append(name)data_batch[3].append(key)embeds = embed_search_images(data_batch[0], embeddings_model)
import time
start = time.time()
res = collection.search(embeds,anns_field='embedding',param={"metric_type": "L2","params": {"nprobe": 10}},limit=TOP_K,output_fields=['filepath'])
finish = time.time()
print(finish - start)
for index, result in enumerate(res):print(index)print(result)
02.匹配更多风格:标示每张图像中的时尚单品
除了直接使用上述代码,查找与你着装风格最相似的 3 位明星以外,我们还可以稍微修改一下代码,拓展项目的应用场景。可以修改代码获取如下所示,不包含边界框的图像。
接下来,将为大家介绍如何修改上述代码寻找更多匹配的穿衣风格。
导入所需的图像处理库和工具
同样,需要先导入所有必要的图像处理库。如果已经完成导入,请跳过此步骤。
import torch
from torch import nn, tensor
from transformers import AutoFeatureExtractor, SegformerForSemanticSegmentation
import matplotlib.pyplot as plt
from torchvision.transforms import Resize
import torchvision.transforms as T
from torchvision.ops import masks_to_boxes
from torchvision.transforms.functional import crop
预处理图像
这个步骤涉及三个函数:get_segmentation、get_masks 和 crop_images。
无需修改 get_segmentation 函数部分的代码。
对于 get_masks 函数,只需要获取与 wanted 列表中的分割 ID 相对应的分割图像即可。
对 crop_image 函数做出更改。在前一篇文的教程中,此函数返回裁剪图像的列表。这里,我们进行一些调整,使函返回三个对象:裁剪图像对应的 embedding 向量、边界框在原始图像上的坐标列表,以及分割 ID 列表。这一改动将转化 embedding 向量的步骤提前了。
wanted = [1, 3, 4, 5, 6, 7, 8, 9, 10, 16, 17]
def get_segmentation(image):inputs = extractor(images=image, return_tensors="pt")outputs = segmentation_model(**inputs)logits = outputs.logits.cpu()upsampled_logits = nn.functional.interpolate(logits,size=image.size[::-1],mode="bilinear",align_corners=False,)pred_seg = upsampled_logits.argmax(dim=1)[0]return pred_seg# returns two lists masks (tensor) and obj_ids (int)
# "mattmdjaga/segformer_b2_clothes" from hugging face
def get_masks(segmentation):obj_ids = torch.unique(segmentation)obj_ids = obj_ids[1:]wanted_ids = [x.item() for x in obj_ids if x in wanted]wanted_ids = torch.Tensor(wanted_ids)masks = segmentation == wanted_ids[:, None, None]return masks, obj_idsdef crop_images(masks, obj_ids, img):boxes = masks_to_boxes(masks)crop_boxes = []for box in boxes:crop_box = tensor([box[0], box[1], box[2]-box[0], box[3]-box[1]])crop_boxes.append(crop_box)preprocess = T.Compose([T.Resize(size=(256, 256)),T.ToTensor()])cropped_images = []seg_ids = []for i in range(len(crop_boxes)):crop_box = crop_boxes[i]cropped = crop(img, crop_box[1].item(), crop_box[0].item(), crop_box[3].item(), crop_box[2].item())cropped_images.append(preprocess(cropped))seg_ids.append(obj_ids[i].item())with torch.no_grad():embeddings = embeddings_model(torch.stack(cropped_images)).squeeze().tolist()return embeddings, boxes.tolist(), seg_ids
有了图像数据之后,就可以加载数据了。这一步骤需要使用到批量插入功能,上篇文章的教程中也有涉及,但不同点在于,本文的教程中将数据作为 dictionary 列表一次性插入。这种插入方式更简洁,同时还允许我们在插入数据时动态新增 Schema 字段。
for path in image_paths:image = Image.open(path)path_split = path.split("/")name = " ".join(path_split[2].split("_"))segmentation = get_segmentation(image)masks, ids = get_masks(segmentation)embeddings, crop_corners, seg_ids = crop_images(masks, ids, image)inserts = [{"embedding": embeddings[x], "seg_id": seg_ids[x], "name": name, "filepath": path, "crop_corner": crop_corners[x]} for x in range(len(embeddings))]collection.insert(inserts)collection.flush()
查询向量数据库
现在可以开始在向量数据库 Milvus 中查询数据了。本文与上篇文章的教程有以下几点区别:
-
将一张图像中匹配的时尚单品数量限制到 5 件。
-
指定查询返回最相似的 3 张图像。
-
添加函数获取图片的色彩图。
随后,在 matplotlib 中设置 figures 和 axes ,代码会循环遍历所有图像,将上文的 3 个函数应用到所有图像上,以获取分割结果和边界框。
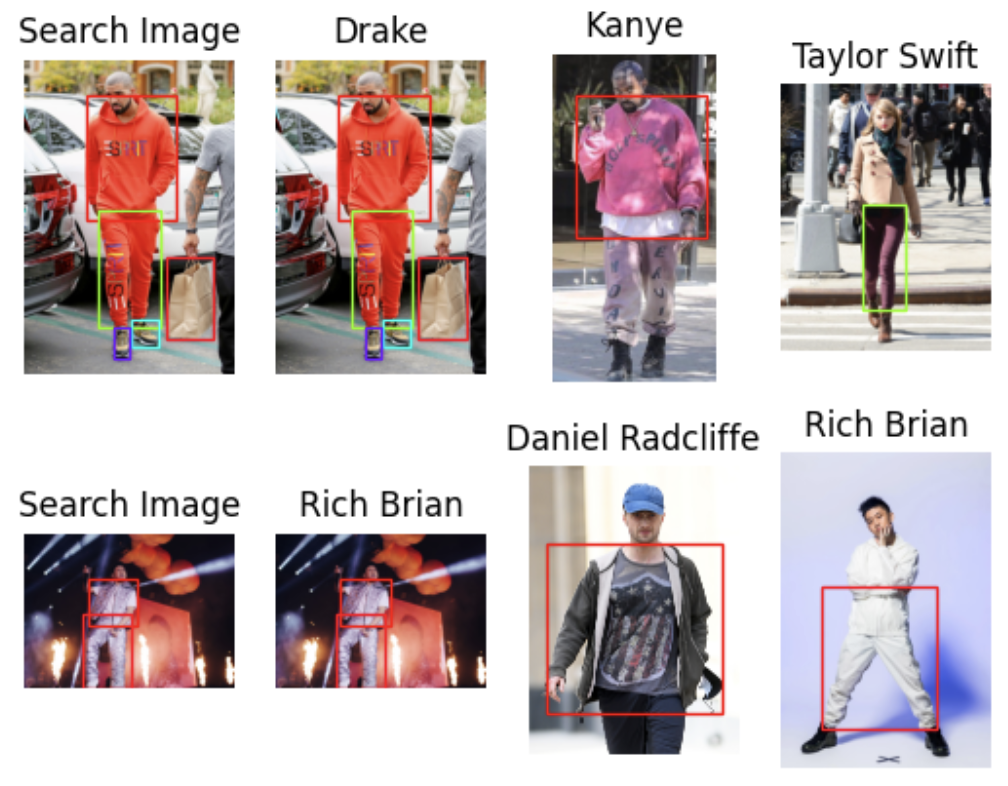
查询数据时,可以根据每张图像中匹配的时尚单品数量来获得最相似的 3 张图像。
最终返回的结果图像中会带有标示出匹配单品的边界框。
from pprint import pprint
from PIL import ImageDraw
from collections import Counter
import matplotlib.patches as patchesLIMIT = 5 # 每张图像中匹配的时尚单品件数
CLOSEST = 3 # 返回的最相似图像数量。CLOSEST <= Limitsearch_paths = ["./photos/Taylor_Swift/Taylor_Swift_2.jpg", "./photos/Jenna_Ortega/Jenna_Ortega_6.jpg"] # Images to search fordef get_cmap(n, name='hsv'):'''Returns a function that maps each index in 0, 1, ..., n-1 to a distinctRGB color; the keyword argument name must be a standard mpl colormap name.Sourced from <https://stackoverflow.com/questions/14720331/how-to-generate-random-colors-in-matplotlib>'''return plt.cm.get_cmap(name, n)# 创建结果 subplot
f, axarr = plt.subplots(max(len(search_paths), 2), CLOSEST + 1)for search_i, path in enumerate(search_paths):# Generate crops and embeddings for all items foundimage = Image.open(path)segmentation = get_segmentation(image)masks, ids = get_masks(segmentation)embeddings, crop_corners, _ = crop_images(masks, ids, image)# 生成色彩图cmap = get_cmap(len(crop_corners))# Display the first box with image being searched foraxarr[search_i][0].imshow(image)axarr[search_i][0].set_title('Search Image')axarr[search_i][0].axis('off')for i, (x0, y0, x1, y1) in enumerate(crop_corners):rect = patches.Rectangle((x0, y0), x1-x0, y1-y0, linewidth=1, edgecolor=cmap(i), facecolor='none')axarr[search_i][0].add_patch(rect)# 查询向量数据库start = time.time()res = collection.search(embeddings,anns_field='embedding',param={"metric_type": "L2","params": {"nprobe": 10}, "offset": 0},limit=LIMIT,output_fields=['filepath', 'crop_corner'])finish = time.time()print("Total Search Time: ", finish - start)# 根据位置给查询结果增加不同的权重filepaths = []for hits in res:seen = set()for i, hit in enumerate(hits):if hit.entity.get("filepath") not in seen:seen.add(hit.entity.get("filepath"))filepaths.extend([hit.entity.get("filepath") for _ in range(len(hits) - i)])# 查找排名最高的图像counts = Counter(filepaths)most_common = [path for path, _ in counts.most_common(CLOSEST)]# 提取每张图像中与查询图像相关的时尚单品matches = {}for i, hits in enumerate(res):matches[i] = {}tracker = set(most_common)for hit in hits:if hit.entity.get("filepath") in tracker:matches[i][hit.entity.get("filepath")] = hit.entity.get("crop_corner")tracker.remove( hit.entity.get("filepath"))# 返回最相似图像:# 返回与查询图像临近的图像image = Image.open(res_path)axarr[search_i][res_i+1].imshow(image)axarr[search_i][res_i+1].set_title(" ".join(res_path.split("/")[2].split("_")))axarr[search_i][res_i+1].axis('off')
# 为匹配单品添加边界框if res_path in value:x0, y0, x1, y1 = value[res_path]rect = patches.Rectangle((x0, y0), x1-x0, y1-y0, linewidth=1, edgecolor=cmap(key), facecolor='none')axarr[search_i][res_i+1].add_patch(rect)
运行上述步骤后,结果如下所示:

03.项目后续:探索更多应用场景
欢迎大家基于本项目拓展更多、更丰富的应用场景,例如:
-
进一步延伸对比功能,例如将不同的单品归类到一起。同样,也可以上传更多图像到数据库中,丰富查询结果。
-
将本项目转变为时尚探测仪或者时尚推荐系统。例如,将明星图像替换成可购买的衣服图像。这样一来,用户上传照片后,可以查询与他的衣服风格相似的其他衣服。
-
还可以基于本项目搭建一个穿搭生成系统,很多方法都可以实现这个应用,但这个应用的搭建相对而言更有难度!本文提供了一种思路,系统可以根据用户上传的多张照片相应推荐穿搭。这里需要用到生成式图像模型,从而提供穿搭建议。
总之,不要限制你的想象力,搭建更丰富的应用。Milvus 之类的向量数据库为相似性搜索应用提供了无限可能。
04.总结
本文教程中,我们进一步拓展了时尚 AI 项目的应用场景。
本次教程使用了 Milvus 全新的 动态 Schema 功能,筛选了分割 ID,在返回图像中保留了边界框。同时,我们在查询中指定 Milvus 根据每张图像中匹配的时尚单品件数返回最相似的 3 张图像。Milvus 全新的动态 Schema 功能支持在上传数据时添加新的字段,改变了我们批量上传数据的方式。使用这个功能后,在上传数据时,无需改动 Schema 即可添加裁剪。在图像预处理步骤中,剔除了一些识别到的非着装类元素。同时,本教程保留了边界框,将转化向量的步骤提前至了裁剪图片的步骤。
当然,通过进一步调整代码,我们还可以搭建更多相关应用,例如:时尚推荐系统、帮助用户搭配着装的系统,甚至是生成式的时尚 AI 应用!
🌟「寻找 AIGC 时代的 CVP 实践之星」 专题活动即将启动!
Zilliz 将联合国内头部大模型厂商一同甄选应用场景, 由双方提供向量数据库与大模型顶级技术专家为用户赋能,一同打磨应用,提升落地效果,赋能业务本身。
如果你的应用也适合 CVP 框架,且正为应用落地和实际效果发愁,可直接申请参与活动,获得最专业的帮助和指导!联系邮箱为 business@zilliz.com。
本文由 mdnice 多平台发布