商城网站建设腾讯体育济南疫情最新情况
目录
概述
前端搭建
后端搭建
生成验证码-存入redis(主要过程代码)
发送邮件(主要过程代码)
登录验证-取出redis中数据进行验证(主要代码)
完整代码一-LoginController
完整代码二-LoginService
完整代码三-LoginInfo
功能测试
概述
*使用邮箱进行登录验证功能实现。
主要功能点:
1.在SpringBoot环境中发送邮件。
2.使用redis进行验证码的缓存及取出验证登录。
整体过程说明
前端搭建简易邮箱登录框,当验证通过后自动跳转到网页index.html。
后端提供两个接口,一个接口用于处理向指定邮箱发送验证码,并将验证码存入redis中,另一个接口用于处理登录验证,验证发来的邮箱地址和验证码是否匹配。
技术选型
前端:前端三剑客,axios
后端:SpringBoot ,redis,javaMail
前端搭建
项目结构

页面展示
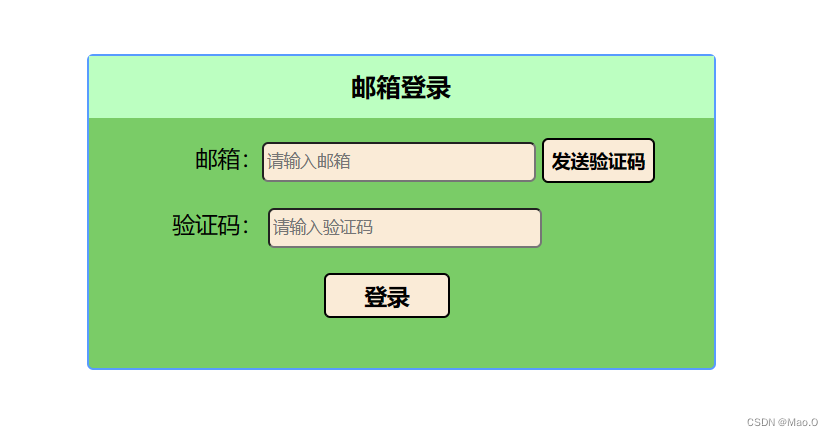
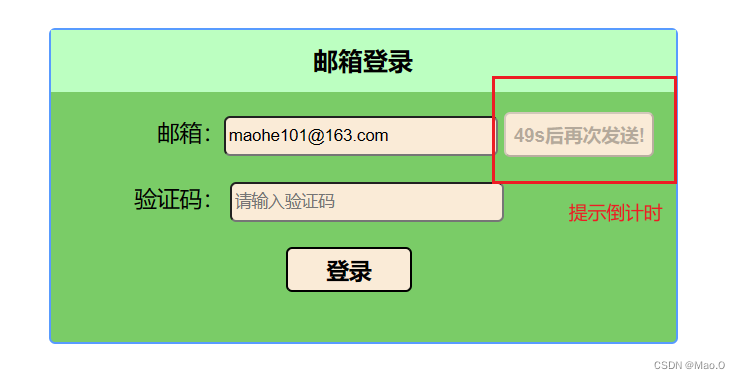
说明 :当我们输入邮箱地址后,点击"发送验证码",会判断输入是否为空以及输入的邮箱是否符合规范,如果输入不为空并且输入的邮箱符合规范,那么按钮将禁用并且提示再次发送的倒计时。
例如:
前端完整代码实例 --- js
// 获取发送验证码按钮节点
let sendCodeBtn = document.querySelector("#sendCodeBtn");
// 获取邮箱地址输入框节点
let emailInput = document.querySelector("#userEmail");
// 获取验证码输入框节点
let verificationCode = document.querySelector("#CheckCode");
// 获取登录按钮节点
let loginBtn = document.querySelector("#loginBtn");// 点击发送验证码逻辑代码
sendCodeBtn.addEventListener("click",function(){// 判断用户输入的邮箱地址是否符合规范let flag = CheckInputEmail(emailInput.value);// 以及判断输入是否为空if(emailInput.value && flag){// 调用方法发送请求,向目标邮箱发送验证码getCode(emailInput.value);alert("验证码发送成功!")// 禁用发送按钮sendCodeBtn.disabled = true;// 设置倒计时,时间到后才可以再次发起验证码请求let time = 60;sendCodeBtn.innerHTML = time + "s后再次发送!"time--;let myInterVal = setInterval(()=>{if(time != 0){sendCodeBtn.innerHTML = time + "s后再次发送!"time--;}else{sendCodeBtn.disabled = false;sendCodeBtn.innerHTML = "发送"clearInterval(myInterVal)}},1000)}else{alert("邮箱格式错误或为空!");}
})// 点击登录按钮逻辑代码
loginBtn.addEventListener("click", function (){// 输入邮箱地址和验证码作为参数进行验证checkCode(emailInput.value,verificationCode.value);
})// 验证邮箱输入格式是否正确
function CheckInputEmail(email){if (!email) {return false;}// 定义邮箱格式的正则表达式const emailRegex = /^[A-Za-z0-9+_.-]+@[A-Za-z0-9.-]+\.[A-Za-z]{2,}$/;// 检查邮箱是否符合格式要求return emailRegex.test(email);
}// 发送请求:获取验证码
function getCode(emailAddress){axios.get("http://localhost:8080/logins?emailAddress="+emailAddress)
}// 发送请求:检查验证码是否正确
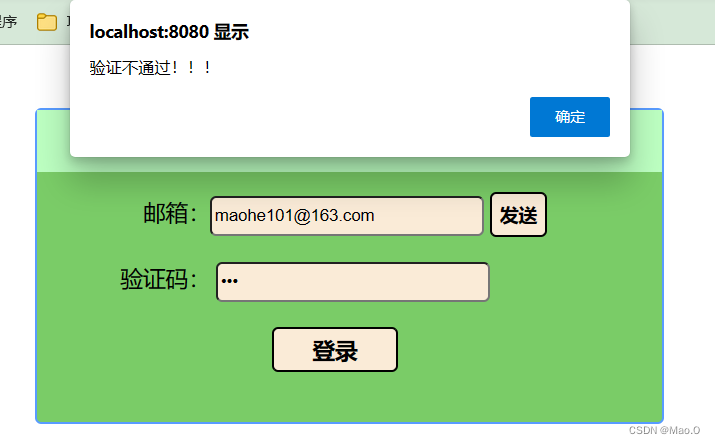
function checkCode(emailAddress, code){axios.post("http://localhost:8080/logins",{emailAddress:emailAddress,code:code}).then(response =>{ // 成功的回调console.log("返回结果====>" + response.data)response.data? window.location = "../html/index.html" : alert("验证不通过!!!");})
}前端完整代码实例 --- html
<!DOCTYPE html>
<html>
<head><meta charset="utf-8"><title></title><link rel="stylesheet" href="../css/login.css"><link href="../favicon.ico" rel="shortcut icon"><script src="../js/axios.min.js"></script>
</head>
<body>
<div id="container"><div id="my_header"><span id="header_title">邮箱登录</span></div><div id="my_body"><div id="body_inputBlock"><label for="userEmail">邮箱:</label><input id="userEmail" type="text" placeholder="请输入邮箱"><button id="sendCodeBtn" type="button">发送验证码</button><br><br><label for="CheckCode">验证码:</label><input id="CheckCode" type="password" placeholder="请输入验证码"><br><button id="loginBtn">登录</button></div></div>
</div>
<script src="../js/login.js"></script>
</body>
</html>
前端完整代码实例 --- css
#container{border: solid #589bff 2px;width: 500px;height: 250px;margin: 50px auto;border-radius: 5px;background-color: #7acc67;
}#my_header{background-color: #bcffc1;height: 50px;line-height: 50px;text-align: center;font-weight: 800;font-size: 20px;
}#my_body{margin-top: 15px;margin-left: 35px;
}#loginBtn{font-weight: 800;font-size: 18px;margin-top: 20px;margin-left: 153px;width: 101px;
}label{width: 104px;display: inline-block;text-align: right;
}
input{border-radius: 5px;height: 27px;width: 212px;background-color: antiquewhite;
}
label{font-size: 18px;
}button{font-size: 15px;border-radius: 5px;background-color: antiquewhite;height: 36px;
}button:hover{cursor: pointer;
}#sendCodeBtn{position: relative;top: 1px;font-weight: 600;
}
后端搭建
目录结构

生成验证码-存入redis(主要过程代码)
1.我们获取时间戳的后四位来模拟随机验证码。
// 截取当前时间戳的后四位模拟验证码
long timestamp = System.currentTimeMillis();
String verificationCode = Long.toString(timestamp).substring(Long.toString(timestamp).length() - 4);2.有了随机的验证码,我们导入redis起步坐标,并简单配置连接信息。
<!--pom.xml导入redis起步坐标-->
<dependency><groupId>org.springframework.boot</groupId><artifactId>spring-boot-starter-data-redis</artifactId>
</dependency>
<!--application.yml中编写-->
redis:host: localhost <!--redis地址-->port: 6379 <!--redis开放端口号-->
3.使用-loginController中编写
/*** 注入redisTemplate用于缓存数据*/
@Autowired
private RedisTemplate<String, String> redisTemplate;
// 将传入邮箱地址为key,验证码为value,存入redis中,并设置超时时间为5分钟
// 参数说明set(key,value, 超时时间,时间单位)
// 至于传入的详细参数,下方会有完整代码提供解释
redisTemplate.opsForValue().set(emailAddress,verificationCode,5, TimeUnit.MINUTES);发送邮件(主要过程代码)
1.获取授权码
说明 :我们想要在编程环境发送邮件,首先需要到我们自己所使用的邮箱中开启POP3/SMTP服务后获取授权密码。
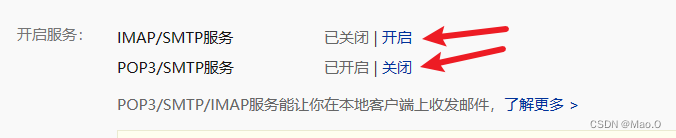
在此我使用的是网易的163邮箱,开启服务并获取授权密码步骤:
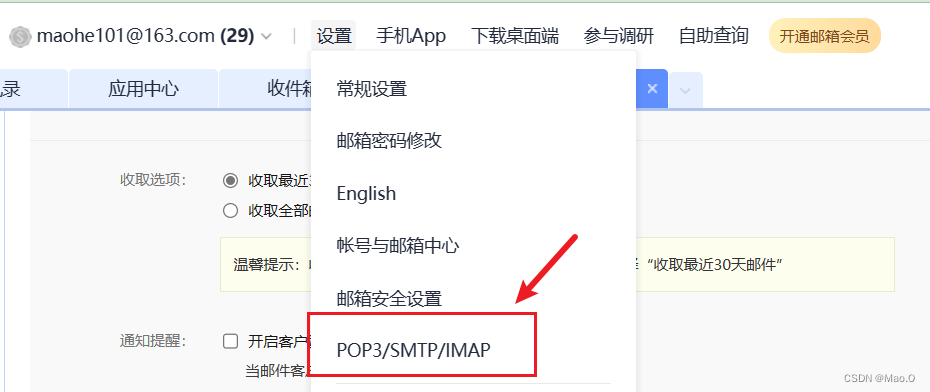
开启任意一个,根据步骤发送个短信后就出现授权码了。
2.编写邮件发送信息(需要授权码)
在application.yml中编写
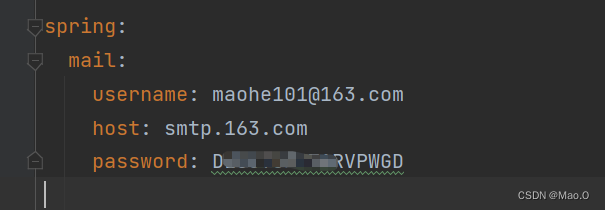
3.编写发送邮件方法-在loginService中编写邮件发送逻辑
// 自动注入JavaMailSender,用于发送邮件动作
@Autowired
private JavaMailSender javaMailSender;
/*** 发送邮件* @param from 发送方* @param to 接收方* @param subject 主题* @param contents 内容* @return 返回执行结果状态*/
public void sendEmail(String from, String to, String subject, String contents){// 创建一个简单消息对象,用于发送简单消息(不带附件或连接等)SimpleMailMessage simpleMailMessage = new SimpleMailMessage();// 封装邮件信息simpleMailMessage.setFrom(from); // 设置发送方simpleMailMessage.setTo(to); // 设置接收方simpleMailMessage.setSubject(subject); // 设置主题simpleMailMessage.setText(contents); // 设置发送内容// 发送动作javaMailSender.send(simpleMailMessage);
}4.调用方法-loginController中编写
/*** 注入loginService用于调用其中自定义的邮件发送方法*/
@Autowired
private LoginService loginService;
// 编写邮件内容模板
String emailInfo = "验证码为:" + verificationCode +",5分钟内有效。";// 发送验证码到目标邮箱
loginService.sendEmail("maohe101@163.com", emailAddress, "登录验证码", emailInfo);登录验证-取出redis中数据进行验证(主要代码)
loginController中编写
// 取出传入数据对比redis中数据,判断是否通过登录验证
// 判断传入的邮箱地址是否存在redis中
if(redisTemplate.hasKey(loginInfo.getEmailAddress())){// 取出对应邮箱地址为key的value值String storyCode = redisTemplate.opsForValue().get(loginInfo.getEmailAddress());// 判断存在redis中的验证码和传入验证码是否相同,相同返回truereturn loginInfo.getCode().equals(storyCode)? "true":"false";
}
return "false";
完整代码一-LoginController
package com.mh.controller;import com.mh.pojo.LoginInfo;
import com.mh.service.LoginService;
import lombok.extern.slf4j.Slf4j;
import org.springframework.beans.factory.annotation.Autowired;
import org.springframework.data.redis.connection.DataType;
import org.springframework.data.redis.core.RedisTemplate;
import org.springframework.web.bind.annotation.*;import java.util.Date;
import java.util.concurrent.TimeUnit;/*** Date:2023/2/28* author:zmh* description: 登录页面相关接口**/
@Slf4j // 用于输出日志
@RestController
@RequestMapping("/logins")
public class LoginController {/*** 注入redisTemplate用于缓存数据*/@Autowiredprivate RedisTemplate<String, String> redisTemplate;/*** 注入loginService用于调用其中自定义的邮件发送方法*/@Autowiredprivate LoginService loginService;/*** 发送邮件* @param emailAddress 目标邮件地址,作为redis存储的key*/@GetMappingpublic void sendEmail(String emailAddress){log.info("====>请求参数邮箱地址为{}",emailAddress);// 1.生成4位随机验证码// 截取当前时间戳的后四位模拟验证码long timestamp = System.currentTimeMillis();String verificationCode = Long.toString(timestamp).substring(Long.toString(timestamp).length() - 4);log.info("====>验证码为:{}",verificationCode);// 2.存入redis// 将传入邮箱地址为key,验证码为value,存入redis中,并设置超时时间为5分钟redisTemplate.opsForValue().set(emailAddress,verificationCode,1, TimeUnit.MINUTES);// 3.编写邮件内容模板String emailInfo = "验证码为:" + verificationCode +",5分钟内有效。";// 4.发送验证码到目标邮箱loginService.sendEmail("maohe101@163.com", emailAddress, "登录验证码", emailInfo);}/*** 登录验证* @param loginInfo 接收前端传入的邮箱地址和code* @return 返回执行结果*/@PostMappingpublic String CheckEmailCode(@RequestBody LoginInfo loginInfo){log.info("=====>POST请求接收到的参数:{}***{}",loginInfo.getEmailAddress(), loginInfo.getCode());// 取出传入数据对比redis中数据,判断是否通过登录验证// 判断传入的邮箱地址是否存在redis中if(redisTemplate.hasKey(loginInfo.getEmailAddress())){// 取出对应邮箱地址为key的value值String storyCode = redisTemplate.opsForValue().get(loginInfo.getEmailAddress());// 判断存在redis中的验证码和传入验证码是否相同,相同返回truereturn loginInfo.getCode().equals(storyCode)? "true":"false";}return "false";}}
完整代码二-LoginService
package com.mh.service;import org.springframework.beans.factory.annotation.Autowired;
import org.springframework.mail.SimpleMailMessage;
import org.springframework.mail.javamail.JavaMailSender;
import org.springframework.stereotype.Service;/*** Date:2023/2/28* author:zmh* description: 登录模块相关业务**/@Service
public class LoginService {@Autowiredprivate JavaMailSender javaMailSender;/*** 发送邮件* @param from 发送方* @param to 接收方* @param subject 主题* @param contents 内容* @return 返回执行结果状态*/public void sendEmail(String from, String to, String subject, String contents){// 创建一个简单消息对象,用于发送简单消息(不带附件或连接等)SimpleMailMessage simpleMailMessage = new SimpleMailMessage();// 封装邮件信息simpleMailMessage.setFrom(from);simpleMailMessage.setTo(to);simpleMailMessage.setSubject(subject);simpleMailMessage.setText(contents);// 发送动作javaMailSender.send(simpleMailMessage);}}
完整代码三-LoginInfo
package com.mh.pojo;import lombok.Data;/*** Date:2023/2/28* author:zmh* description: 登录信息-用于接收前端传入的body数据**/@Data
public class LoginInfo {String emailAddress;String code;}
功能测试
说明:在测试之前我们可以关闭一下浏览器缓存,方便我们测试。F12打开控制台

输入邮箱获取验证码

邮箱接收到验证码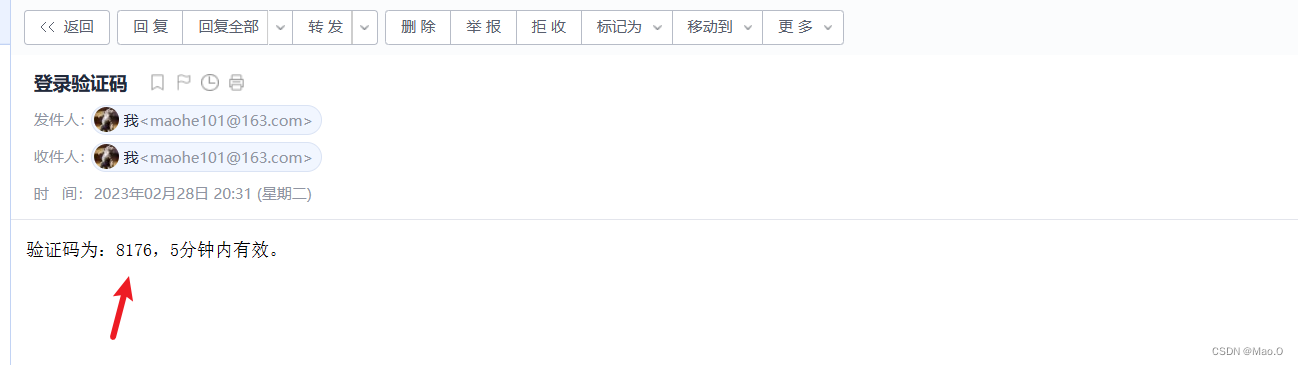
输入错误验证码,进行对比验证
输入正确验证码,进行对比验证
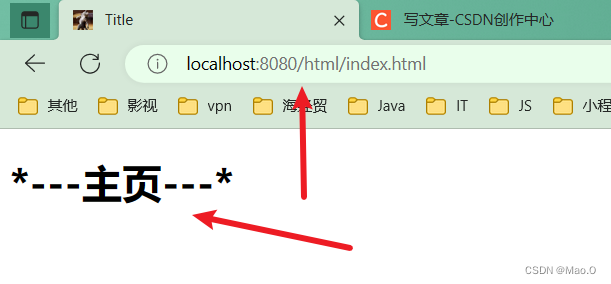
验证成功,自动跳转到index.heml网页,功能测试完成。