地推接单在哪个平台找手机优化专家
前言:记录自己安装TVM的流程,以及一个简单的利用TVM编译模型并执行的示例。
1,官网下载TVM源码
git clone --recursive https://github.com/apache/tvmgit submodule init
git submodule update
顺便完成准备工作,比如升级cmake版本需要3.18及以上版本。还有如下库:
sudo apt-get update
sudo apt-get install -y python3 python3-dev python3-setuptools gcc libtinfo-dev zlib1g-dev build-essential cmake libedit-dev libxml2-dev
2,安装clang,llvm,ninja
llvm安装依赖clang和ninja,所以直接安装llvm即可顺便完成全部的安装。
llvm ,clang安装参考:Linux系统无痛编译安装LLVM简明指南_linux安装llvm11-CSDN博客
步骤如下:
git clone git@github.com:llvm/llvm-project.gitcd llvm-project
mkdir buildcd buildsudo cmake ../llvm -DLLVM_TARGETS_TO_BUILD=X86 -DCMAKE_BUILD_TYPE=Debug
sudo make -j8
sudo make install
检查版本:
clang --version
llvm-as --version
3,安装NNPACK
NNPACK是为了优化加速神经网络的框架,可以提高在CPU上的计算效率
git clone --recursive https://github.com/Maratyszcza/NNPACK.git
cd NNPACK
# Add PIC option in CFLAG and CXXFLAG to build NNPACK shared library
sed -i "s|gnu99|gnu99 -fPIC|g" CMakeLists.txt
sed -i "s|gnu++11|gnu++11 -fPIC|g" CMakeLists.txt
mkdir build
cd build
# Generate ninja build rule and add shared library in configuration
cmake -G Ninja -D BUILD_SHARED_LIBS=ON ..
ninja
sudo ninja install# Add NNPACK lib folder in your ldconfig
sudo sh -c "echo '/usr/local/lib'>> /etc/ld.so.conf.d/nnpack.conf"
sudo ldconfig
4,编译TVM
如下步骤,在tvm建立build文件夹,把config.cmake复制到build中
cd tvm
mkdir buildcp cmake/config.cmake build
build里的config.cmake是编译配置文件,可以按需打开关闭一些开关。下面是我修改的一些配置(TENSORRT和CUDNN我以为之前已经配置好了,结果编译报了这两个的错误,如果只是想跑流程,可以不打开这两个的开关,这样就能正常编译结束了)
set(USE_RELAY_DEBUG ON)
set(USE_CUDA ON)
set(USE_NNPACK ON)
set(USE_LLVM ON)
set(USE_TENSORRT_CODEGEN ON)
set(USE_TENSORRT_RUNTIME ON)
set(USE_CUDNN ON)
编译代码:
cd build
cmake ..make -j12
5,配置python环境
从build文件夹出来进入到tvm/python文件夹下,执行如下命令,即可配置python中的tvm库了。
cd ../python
python setup.py install
python中使用tvm测试,导入tvm不出错即配置tvm安装成功
import tvmprint(tvm.__version__)
6,一个简单示例
该测试来自TVM官方文档的示例,包括编译一个测试执行一个分类网络和编译器自动调优测试。仅先直观的看到TVM如何作为一个工具对模型编译并部署的流程。
1) 下载onnx模型
wget https://github.com/onnx/models/raw/b9a54e89508f101a1611cd64f4ef56b9cb62c7cf/vision/classification/resnet/model/resnet50-v2-7.onnx
2) 编译onnx模型
python -m tvm.driver.tvmc compile --target "llvm" --input-shapes "data:[1,3,224,224]" --output resnet50-v2-7-tvm.tar resnet50-v2-7.onnx如果报这样的警告:
就在git上下载一份tophub,把整个文件夹tophub复制到 ~/.tvm/路径下
git clone git@github.com:tlc-pack/tophub.git
sudo cp -r tophub ~/.tvm/
解压生成的tvm编译模型,得到3个文件:
-
mod.so作为一个C++库的编译模型, 能被 TVM runtime加载 -
mod.json TVM Relay计算图的文本表示 -
mod.paramsonnx模型的预训练权重参数
mkdir model
tar -xvf resnet50-v2-7-tvm.tar -C model
ls model
3) 输入数据前处理
python preprocess.py图像处理代码文件:preprocess.py
#!python ./preprocess.py
from tvm.contrib.download import download_testdata
from PIL import Image
import numpy as npimg_url = "https://s3.amazonaws.com/model-server/inputs/kitten.jpg"
img_path = download_testdata(img_url, "imagenet_cat.png", module="data")# Resize it to 224x224
resized_image = Image.open(img_path).resize((224, 224))
img_data = np.asarray(resized_image).astype("float32")# ONNX expects NCHW input, so convert the array
img_data = np.transpose(img_data, (2, 0, 1))# Normalize according to ImageNet
imagenet_mean = np.array([0.485, 0.456, 0.406])
imagenet_stddev = np.array([0.229, 0.224, 0.225])
norm_img_data = np.zeros(img_data.shape).astype("float32")
for i in range(img_data.shape[0]):norm_img_data[i, :, :] = (img_data[i, :, :] / 255 - imagenet_mean[i]) / imagenet_stddev[i]# Add batch dimension
img_data = np.expand_dims(norm_img_data, axis=0)# Save to .npz (outputs imagenet_cat.npz)
np.savez("imagenet_cat", data=img_data)
4) 运行编译模型
python -m tvm.driver.tvmc run --inputs imagenet_cat.npz --output predictions.npz resnet50-v2-7-tvm.tar5) 输出后处理
python postprocess.py执行之后得到分类结果的输出:
class='n02123045 tabby, tabby cat' with probability=0.621104
class='n02123159 tiger cat' with probability=0.356378
class='n02124075 Egyptian cat' with probability=0.019712
class='n02129604 tiger, Panthera tigris' with probability=0.001215
class='n04040759 radiator' with probability=0.000262
后处理代码:postprocess.py
#!python ./postprocess.py
import os.path
import numpy as npfrom scipy.special import softmaxfrom tvm.contrib.download import download_testdata# Download a list of labels
labels_url = "https://s3.amazonaws.com/onnx-model-zoo/synset.txt"
labels_path = download_testdata(labels_url, "synset.txt", module="data")with open(labels_path, "r") as f:labels = [l.rstrip() for l in f]output_file = "predictions.npz"# Open the output and read the output tensor
if os.path.exists(output_file):with np.load(output_file) as data:scores = softmax(data["output_0"])scores = np.squeeze(scores)ranks = np.argsort(scores)[::-1]for rank in ranks[0:5]:print("class='%s' with probability=%f" % (labels[rank], scores[rank]))
6) 编译器自动调优
调优的算法使用的是xgboost,所以需要python安装一下这个库。
pip install xgboostpython -m tvm.driver.tvmc tune --target "llvm" --output resnet50-v2-7-autotuner_records.json resnet50-v2-7.onnx7) 重新编译并执行调优后的模型
python -m tvm.driver.tvmc compile --target "llvm" --tuning-records resnet50-v2-7-autotuner_records.json --output resnet50-v2-7-tvm_autotuned.tar resnet50-v2-7.onnxpython -m tvm.driver.tvmc run --inputs imagenet_cat.npz --output predictions.npz resnet50-v2-7-tvm_autotuned.tarpython postprocess.py预测结果:
class='n02123045 tabby, tabby cat' with probability=0.610552
class='n02123159 tiger cat' with probability=0.367180
class='n02124075 Egyptian cat' with probability=0.019365
class='n02129604 tiger, Panthera tigris' with probability=0.001273
class='n04040759 radiator' with probability=0.000261
8) 比较编译前后执行模型的速度
python -m tvm.driver.tvmc run --inputs imagenet_cat.npz --output predictions.npz --print-time --repeat 100 resnet50-v2-7-tvm_autotuned.tarpython -m tvm.driver.tvmc run --inputs imagenet_cat.npz --output predictions.npz --print-time --repeat 100 resnet50-v2-7-tvm.tar
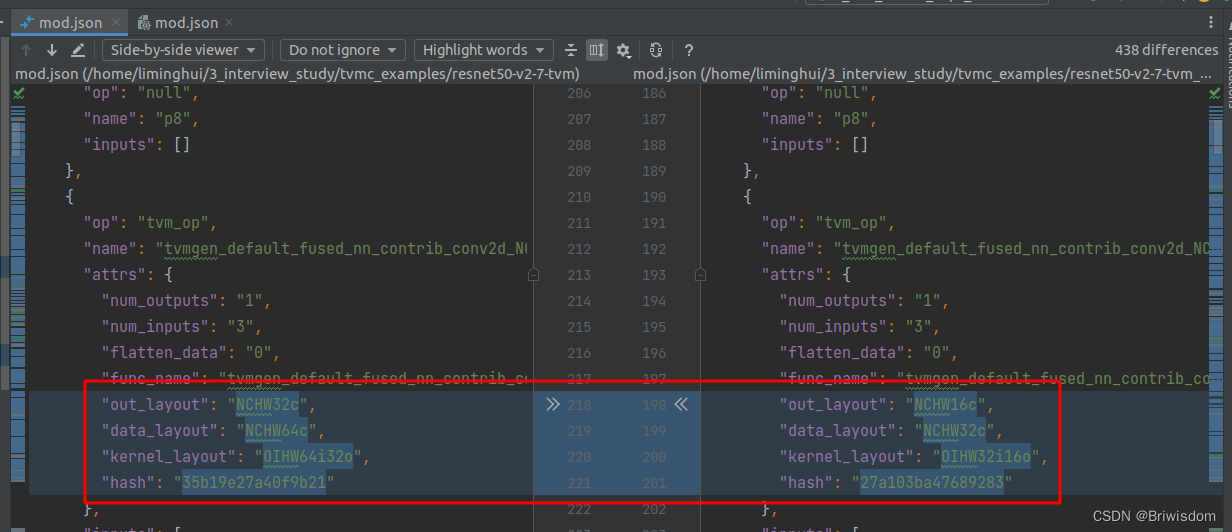
执行时间如下,上面是自动调优过的的,可以明显看出推理时间上的优化效果。
Execution time summary:mean (ms) median (ms) max (ms) min (ms) std (ms) 84.6208 74.9435 143.9276 72.8249 19.0734 mean (ms) median (ms) max (ms) min (ms) std (ms) 131.1953 130.7819 140.6614 106.0725 3.5606比较了一下两个编译后模型的Relay计算图json文件的区别,就看到了算子数据layout的区别,更多细节还是要看源码吧
参考:TVM Ubuntu20安装_ubuntu20.04配置tvm_shelgi的博客-CSDN博客